This past autumn I had the opportunity to take Bookbinding Level II through the Canadian Bookbinding and Book Arts Guild (CCBAG). During level two one of the things we learned was how to do sewn endbands. Previously in level one we had done endbands made from cord and cloth wrapped around it. These are known as “stuck on endbands” and they have been used as far back as the 1800s. I recently bought some prior to level two; they come in useful for a quick work!
Image credit: Arielle’s Bindery
Above is a picture of what they can look like. As you can see, all a binder would need to do is snip the endband to the correct size and stick it on with a bit of glue to the spine of the book at the head and tail.
Just to note, I’ve used the term endband to imply both bands at either head or tail of the book. Specifically, the band at the head is called a headband and the band at the tail is called an endband, however many people use either term to refer generically to both head and tail and often don’t specify. During class we called them endbands and so in this post I will refer to them as endbands.
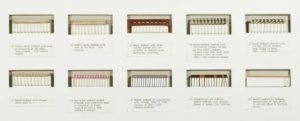
Endbands are decorative and structural in function. The endbands can add strength and support to a binding. Sewn endbands consist of a core with either silk or linen thread wrapped around it. A core for an endband can be made from: cord, rolled paper, rolled leather, or a combination of leather and vellum. The core is generally thin, though you can create more elaborate endbands from double cores. In level two I learned how to do a two-color endband and a foundation endband. You can see these below. The two-color endband is number seven and the foundation endband (also called conservation endband) is number one.
Image credit: http://www.artesdellibro.com
Endbands can get even more creative and artistic than the variety shown here. Here are some found on the web:
Image credit: lilbookbinder.wordpress.com
Another style of endband is the Coptic endband. This endband has the weave going continuously from board across textblock and back to other board.
Image credit: henryhebert.net
Learning the endbands wasn’t as difficult as I imagined it might be, though it did take practice! We worked with silk thread and went around cord. The thread was probably the hardest to manage, being silk. Keeping the tension tight for the length of the endband was also something that required practice. In order to learn Dan (our teacher) had us practice on old telephone books. This allowed us to work with a larger cord and a larger textblock. Below is an photo of the two-color endband that we learned.
Image credit: Arielle’s Bindery
The endbands get sewn into the textblock and when working on a telephone book that proved to be tricky. Often times pliers were needed to help the needle along through the thickness of the book, when it came time to sew our actual textblocks it was much easier. As a result, the back of the phone book looks a bit messy from lots of practice attempts. Looking online though one can see many examples of sewn endbands that look very neat and uniform on the spine! Below is an image of the formation endband.
Image credit: Arielle’s Bindery
I find sewing endbands to be rather relaxing, other binders find it tedious. It certainly adds to the appeal of a book, I think. It’s certainly something that requires a bit of practice to get them really looking nice, and with so many styles to learn there is a lot to practice!
Guest blogger Arielle VanderSchans is a linguist and librarian living in Canada. She currently studies bookbinding through the Canadian Bookbinding and Book Arts Guild. You can follow her as she learns the trade here: https://ariellesbindery.com


